Week 2: PyTorch Eager Mode
PyTorch + NPU 온라인 모임 #2 | 2024-12-11
소개
이번 강의는 PyTorch 기초의 첫 번째 시간으로, Eager mode에 대해 다룹니다. 크게 네 부분으로 구성됩니다:
- Eager mode의 high-level architecture
torch.matmul예제 - call stack을 따라가며 Operator(Op)가 실제로 어떻게 dispatch되고 실행되는지를 분석합니다- Eager mode에 대한 detail -
torch.matmul예제에서 등장한 개념들을 Tensor, Operator, Runtime 세 축으로 나눠 상세히 살펴봅니다 - PyTorch build - 빌드 과정과 빌드 산출물에 대한 개요
torch.matmul을 수행하면 어떤 일이 일어나는가?
PyTorch에서 x = torch.matmul(y, z)를 실행하면 내부적으로 어떤 일이 벌어질까요? 파이썬에서 import torch를 한 뒤 텐서를 만들어 연산을 수행하면 결과가 나오고, 이를 프린트해 볼 수 있습니다. 그런데 그 과정에서 실제로 어떤 일이 일어나는지를 파악하는 가장 효과적인 방법 중 하나는 call stack을 확인해 보는 것입니다.
Call Stack 분석
GPU에서 matmul이 수행되도록 설정한 상태에서 CUDA GEMM 진입점에 breakpoint를 걸고 torch.matmul을 수행했을 때의 call stack snapshot을 보면, 꽤 많은 중간 단계를 거쳐 실제 수행 지점까지 진입한다는 것을 알 수 있습니다.
#0 at::cuda::blas::gemm<float> at aten/src/ATen/cuda/CUDABlas.cpp:1127
#1 operator at aten/src/ATen/native/cuda/Blas.cpp:457
#2 operator at aten/src/ATen/native/cuda/Blas.cpp:457
#3 at::native:: at aten/src/ATen/native/cuda/Blas.cpp:457
#4 at::native::structured_mm_out_cuda::impl at aten/src/ATen/native/cuda/Blas.cpp:604
#5 at:: at build/aten/src/ATen/RegisterCUDA.cpp:12173
#6 c10::impl::detail::WrapFunctionIntoFunctor_<... at aten/src/ATen/core/boxing/impl/WrapFunctionIntoFunctor.h:13
#7 c10::impl::wrap_kernel_functor_unboxed_<... at aten/src/ATen/core/boxing/impl/make_boxed_from_unboxed_functor.h:468
#8 c10::callUnboxedKernelFunction<... at aten/src/ATen/core/boxing/KernelFunction_impl.h:53
#9 c10::KernelFunction::call<at::Tensor, at::Tensor const&, at::Tensor const&> at aten/src/ATen/core/boxing/KernelFunction_impl.h:105
#10 c10::Dispatcher::redispatch<at::Tensor, at::Tensor const&, at::Tensor const&> at aten/src/ATen/core/dispatch/Dispatcher.h:714
#11 c10::TypedOperatorHandle<at::Tensor at aten/src/ATen/core/dispatch/Dispatcher.h:536
#12 at::_ops::mm::redispatch at build/aten/src/ATen/Operators_3.cpp:4010
#13 at::redispatch::mm at build/aten/src/ATen/RedispatchFunctions.h:5217
#14 operator at torch/csrc/autograd/generated/VariableType_3.cpp:13455
#15 torch::autograd::VariableType:: at torch/csrc/autograd/generated/VariableType_3.cpp:13456
#16 c10::impl::detail::WrapFunctionIntoFunctor_<... at aten/src/ATen/core/boxing/impl/WrapFunctionIntoFunctor.h:13
#17 c10::impl::wrap_kernel_functor_unboxed_<... at aten/src/ATen/core/boxing/impl/make_boxed_from_unboxed_functor.h:485
#18 c10::callUnboxedKernelFunction<at::Tensor, at::Tensor const&, at::Tensor const&> at aten/src/ATen/core/boxing/KernelFunction_impl.h:53
#19 c10::KernelFunction::call<at::Tensor, at::Tensor const&, at::Tensor const&> at aten/src/ATen/core/boxing/KernelFunction_impl.h:105
#20 c10::Dispatcher::callWithDispatchKeySlowPath<... at aten/src/ATen/core/dispatch/Dispatcher.h:661
#21 c10::Dispatcher::call<at::Tensor, at::Tensor const&, at::Tensor const&> at aten/src/ATen/core/dispatch/Dispatcher.h:680
#22 c10::TypedOperatorHandle<at::Tensor at aten/src/ATen/core/dispatch/Dispatcher.h:531
#23 at::_ops::mm::call at build/aten/src/ATen/Operators_3.cpp:4003
#24 at::Tensor::mm at build/aten/src/ATen/core/TensorBody.h:2999
#25 at::native::_matmul_impl at aten/src/ATen/native/LinearAlgebra.cpp:2031
#26 at::native::matmul at aten/src/ATen/native/LinearAlgebra.cpp:2181
#27 at:: at build/aten/src/ATen/RegisterCompositeImplicitAutograd.cpp:2774
#28 c10::impl::detail::WrapFunctionIntoFunctor_<... at aten/src/ATen/core/boxing/impl/WrapFunctionIntoFunctor.h:13
#29 c10::impl::wrap_kernel_functor_unboxed_<... at aten/src/ATen/core/boxing/impl/make_boxed_from_unboxed_functor.h:468
#30 c10::callUnboxedKernelFunction<at::Tensor, at::Tensor const&, at::Tensor const&> at aten/src/ATen/core/boxing/KernelFunction_impl.h:53
#31 c10::KernelFunction::call<at::Tensor, at::Tensor const&, at::Tensor const&> at aten/src/ATen/core/boxing/KernelFunction_impl.h:105
#32 c10::Dispatcher::callWithDispatchKeySlowPath<... at aten/src/ATen/core/dispatch/Dispatcher.h:661
#33 c10::Dispatcher::call<at::Tensor, at::Tensor const&, at::Tensor const&> at aten/src/ATen/core/dispatch/Dispatcher.h:680
#34 c10::TypedOperatorHandle<at::Tensor at aten/src/ATen/core/dispatch/Dispatcher.h:531
#35 at::_ops::matmul::call at build/aten/src/ATen/Operators_4.cpp:3192
#36 at::Tensor::matmul at build/aten/src/ATen/core/TensorBody.h:2899
#37 operator at torch/csrc/autograd/generated/python_torch_functions_0.cpp:4909
#38 torch::autograd::THPVariable_matmul at torch/csrc/autograd/generated/python_torch_functions_0.cpp:4911
#39 cfunction_call at /usr/local/src/conda/python-3.13.0/Objects/methodobject.c:540
#40 _PyObject_MakeTpCall at /usr/local/src/conda/python-3.13.0/Objects/call.c:242
#41 _PyEval_EvalFrameDefault at /usr/local/src/conda/python-3.13.0/Python/generated_cases.c.h:813
#42 PyEval_EvalCode at /usr/local/src/conda/python-3.13.0/Python/ceval.c:596
#43 run_eval_code_obj at /usr/local/src/conda/python-3.13.0/Python/pythonrun.c:1323
#44 run_mod at /usr/local/src/conda/python-3.13.0/Python/pythonrun.c:1408
#45 pyrun_file at /usr/local/src/conda/python-3.13.0/Python/pythonrun.c:1241
#46 _PyRun_SimpleFileObject at /usr/local/src/conda/python-3.13.0/Python/pythonrun.c:490
#47 _PyRun_AnyFileObject at /usr/local/src/conda/python-3.13.0/Python/pythonrun.c:77
#48 pymain_run_file_obj at /usr/local/src/conda/python-3.13.0/Modules/main.c:409
#49 pymain_run_file at /usr/local/src/conda/python-3.13.0/Modules/main.c:428
#50 pymain_run_python at /usr/local/src/conda/python-3.13.0/Modules/main.c:696
#51 Py_RunMain at /usr/local/src/conda/python-3.13.0/Modules/main.c:775
#52 Py_BytesMain at /usr/local/src/conda/python-3.13.0/Modules/main.c:829
#53 __libc_start_call_main at ../sysdeps/nptl/libc_start_call_main.h:58
#54 __libc_start_main_impl at ../csu/libc-start.c:360
Call depth가 무려 55단계나 됨 뭔가 엄청 복잡한 일이 일어나고 있는 것처럼 보임
Eager mode에서는 breakpoint를 잡은 시점에서 이전 상태를 파악하기 어려운 경우도 많지만, torch.matmul 같은 경우에는 call stack을 보면 어떤 과정을 거쳐 어떤 일이 일어났는지 거의 다 파악할 수 있습니다.
왜 이렇게 복잡한가?
Call stack이 55단계나 되는 이유는 크게 세 가지로 나눌 수 있습니다.
1. torch.matmul 자체의 복잡성
단순히 2D 매트릭스를 곱하는 것이라면 그냥 곱하면 되지만, torch.matmul은 input tensor의 shape에 따라 서로 다른 연산으로 분기합니다:
| Input 조합 | 호출되는 연산 |
|---|---|
| 1D × 1D | torch.dot |
| 2D × 1D | torch.mv |
| 2D × 2D | torch.mm |
| 3D 이상 (batch) | torch.bmm |
| 차원 불일치 시 | broadcast 후 위 연산 중 하나 |
2. Language boundary 전환
PyTorch는 단일 언어가 아니라 Python → C++ → CUDA(또는 다른 kernel language)로 이어지는 다층 구조입니다. 각 전환마다 binding, dispatch, wrapper 코드가 필요하므로 call stack이 길어집니다.
3. 다양한 실행 시나리오의 동적 결정
같은 matmul 호출이라도 런타임 상황에 따라 실행 경로가 달라집니다:
| 결정 축 | 가능한 경우 |
|---|---|
| Device | CPU, CUDA, XPU, MPS, … |
| Autograd | backward graph 생성 필요 vs 불필요 |
| Tracing | torch.jit.trace / torch.compile 중 vs 아님 |
위 표는 대표적인 예시일 뿐이며, 실제로는 이보다 더 많은 dispatch key가 존재합니다.
같은 matmul op이라 하더라도 실행되는 실제 시나리오가 상당히 다양하고, 이런 경우를 모두 커버해야 하기 때문에 내부적으로 복잡한 일들이 일어나게 됩니다.
이를 지원하기 위해 dispatcher가 dispatch key set에 따라 kernel을 선택하고 redispatch하는 과정이 반복되며,
각 key는 device, autograd, tracing 같은 서로 다른 관심사를 독립적으로 처리하도록 설계되어 있습니다.
이것이 call stack이 깊어지는 주된 원인입니다.
Week 1에 소개했던 PyTorch의 주요 특성과의 연관
지난주에 정리했던 PyTorch의 주요 특성 중, 오늘 다루는 Eager mode의 call stack과 직접 연관되는 항목들을 정리하면 다음과 같습니다. 회색 항목은 이번 주에는 해당하지 않는 부분입니다.
| 특성 | 이번 주 연관 |
|---|---|
| NumPy-like experience | O - interactive mode로 텐서 연산을 곧바로 실행 |
| Heterogeneous computing | O - Device별 dispatch의 기반 |
| X - 이번 주 범위 아님 | |
| Integration with compute libraries / ML compiler | O - cuBLAS 등 외부 라이브러리 호출 |
| Three language layers (Python → C++ → kernel) | O - call stack에서 language boundary 전환이 직접 드러남 |
| X - graph mode는 다음 주 | |
| Codegen을 적극적으로 활용 | O - call stack의 상당 부분이 자동 생성 코드 |
| Various backend integration points | O - dispatch target으로서의 backend 등록 |
특히 Codegen 활용은 Week 1에서 빠져있던 항목으로, 이번 주에 새로 추가됩니다. PyTorch 코드베이스의 가장 큰 특성 중 하나는 도구에 의해 자동 생성되는 코드가 굉장히 많다는 것입니다. 같은 기능을 하는 코드가 operator마다 반복되기 때문에, 프로그래머가 직접 작성하는 것보다 도구를 만들어 코드 생성을 하도록 설계되어 있으며, automated differentiation도 이 코드 생성으로 구현됩니다.
Python vs. PyTorch Internal (C++)
Call stack은 밑에서 위로 진입합니다. 크게 두 영역으로 나뉘며, 오늘은 위쪽의 PyTorch internal (C++) 영역을 중심으로 살펴봅니다.
PyTorch Internal (C++): #0 ~ #38
| # | Call Stack | 역할 |
|---|---|---|
| #0 | at::cuda::blas::gemm<float> at CUDABlas.cpp:1127 | cuBLAS GEMM 호출 - 실제 GPU 행렬곱 수행 진입점 |
| #1-3 | operator at native/cuda/Blas.cpp:457 | CUDA mm 내부 lambda - cuBLAS 호출을 감싸는 wrapper |
| #4 | at::native::structured_mm_out_cuda::impl at native/cuda/Blas.cpp:604 | CUDA mm 구현체 - structured kernel의 device별 impl |
| #5 | at:: at build/.../RegisterCUDA.cpp:12173 | CUDA backend 등록 - native_functions.yaml에서 생성된 CUDA dispatch 등록 코드 (자동생성) |
| #6-9 | WrapFunctionIntoFunctor → KernelFunction::call at boxing/*.h | dispatch logic - 등록된 kernel functor를 unboxed 호출로 변환하여 실행 |
| #10 | c10::Dispatcher::redispatch at Dispatcher.h:714 | redispatch - Autograd kernel 처리 후 다음 dispatch key(CUDA)로 재전달 |
| #11 | c10::TypedOperatorHandle at Dispatcher.h:536 | redispatch의 typed handle wrapper |
| #12 | at::_ops::mm::redispatch at build/.../Operators_3.cpp:4010 | mm redispatch frontend - op별 생성된 redispatch 진입점 (자동생성) |
| #13 | at::redispatch::mm at build/.../RedispatchFunctions.h:5217 | mm redispatch convenience 함수 (자동생성) |
| #14 | operator at generated/VariableType_3.cpp:13455 | Autograd kernel 내부 lambda (자동생성) |
| #15 | torch::autograd::VariableType::mm at generated/VariableType_3.cpp:13456 | Autograd kernel - backward graph 세팅 후 forward 실행, gradient 필요 시 기록 (자동생성) |
| #16-19 | WrapFunctionIntoFunctor → KernelFunction::call at boxing/*.h | dispatch logic - mm의 Autograd key에 대한 kernel 실행 |
| #20 | c10::Dispatcher::callWithDispatchKeySlowPath at Dispatcher.h:661 | dispatch key set에서 최우선 key를 선택하여 해당 kernel 탐색 |
| #21 | c10::Dispatcher::call at Dispatcher.h:680 | dispatch 진입 - mm op에 대한 첫 번째 dispatch (Autograd key 선택) |
| #22 | c10::TypedOperatorHandle at Dispatcher.h:531 | dispatch의 typed handle wrapper |
| #23 | at::_ops::mm::call at build/.../Operators_3.cpp:4003 | mm C++ frontend - op별 생성된 dispatch 진입점, dispatch key set 계산 후 Dispatcher 호출 (자동생성) |
| #24 | at::Tensor::mm at build/.../TensorBody.h:2999 | at::Tensor의 mm 메서드 - mm::call로 위임 |
| #25 | at::native::_matmul_impl at LinearAlgebra.cpp:2031 | matmul 구현체 - input shape 분석 후 적절한 연산(mm, bmm 등) 선택 |
| #26 | at::native::matmul at LinearAlgebra.cpp:2181 | matmul 진입 - _matmul_impl로 위임 |
| #27 | at:: at build/.../RegisterCompositeImplicitAutograd.cpp:2774 | matmul kernel 등록 - device/autograd 무관한 composite kernel로 등록 (자동생성) |
| #28-31 | WrapFunctionIntoFunctor → KernelFunction::call at boxing/*.h | dispatch logic - matmul의 CompositeImplicitAutograd key에 대한 kernel 실행 |
| #32 | c10::Dispatcher::callWithDispatchKeySlowPath at Dispatcher.h:661 | dispatch key set에서 최우선 key를 선택하여 해당 kernel 탐색 |
| #33 | c10::Dispatcher::call at Dispatcher.h:680 | dispatch 진입 - matmul op에 대한 dispatch |
| #34 | c10::TypedOperatorHandle at Dispatcher.h:531 | dispatch의 typed handle wrapper |
| #35 | at::_ops::matmul::call at build/.../Operators_4.cpp:3192 | matmul C++ frontend - op별 생성된 dispatch 진입점 (자동생성) |
| #36 | at::Tensor::matmul at build/.../TensorBody.h:2899 | at::Tensor의 matmul 메서드 - matmul::call로 위임 |
| #37 | operator at generated/python_torch_functions_0.cpp:4909 | Python binding 내부 lambda - Python 인자 파싱 후 C++ 호출 (자동생성) |
| #38 | torch::autograd::THPVariable_matmul at generated/python_torch_functions_0.cpp:4911 | Python → C++ 진입점 - torch.matmul() 호출 시 CPython이 최초로 진입하는 C++ 함수 (자동생성) |
CPython / libc: #39 ~ #54 (오늘은 스킵)
| # | Call Stack | 역할 |
|---|---|---|
| #39 | cfunction_call at Objects/methodobject.c:540 | CPython이 C 확장 함수(PyCFunction)를 호출하는 진입점 |
| #40 | _PyObject_MakeTpCall at Objects/call.c:242 | CPython 호출 프로토콜 - tp_call 슬롯을 통한 callable 객체 호출 |
| #41 | _PyEval_EvalFrameDefault at Python/generated_cases.c.h:813 | CPython 바이트코드 인터프리터 - CALL 명령어 처리 중 |
| #42 | PyEval_EvalCode at Python/ceval.c:596 | 컴파일된 code object를 프레임에서 평가 |
| #43-51 | run_eval_code_obj → Py_RunMain at Python/pythonrun.c ~ Modules/main.c | Python 런타임 초기화 및 스크립트 파일 실행 체인 |
| #52 | Py_BytesMain at Modules/main.c:829 | Python 프로세스 시작점 - python3 바이너리의 main 함수 |
| #53-54 | __libc_start_main at libc_start_call_main.h:58 | libc 진입 - OS가 프로세스를 시작하는 최하위 레벨 |
PyTorch Eager Mode: High-Level Architecture
전체적으로 Eager mode가 어떻게 생겼는지 먼저 짚고 넘어가겠습니다.
실제 op을 수행하면 먼저 Python에서 시작하여 C++에 해당하는 Front-End 부분으로 넘어갑니다. Front-End는 op을 Dispatcher에게 전달하고, Dispatcher는 dispatch key set에서 우선순위가 가장 높은 key를 선택하여 해당 kernel을 호출합니다.
핵심은 kernel이 작업을 마친 후 다시 Dispatcher로 redispatch한다는 점입니다. 이 dispatch → kernel → redispatch의 반복이 call stack의 depth가 깊어지는 이유입니다. 예를 들어 Autograd kernel이 backward graph를 세팅한 뒤, 다음 dispatch key(예: CUDA)로 redispatch하면 Dispatcher가 다시 해당 device backend kernel을 선택합니다. 이 Dispatcher ↔ Kernel 간의 순환 덕분에 autograd, backend 등 여러 kernel이 하나의 op 호출에 차례로 개입할 수 있습니다. 최종적으로 device backend kernel이 Device Runtime을 사용해 실제 연산을 수행합니다.
Call Stack의 주요 특성
자동 생성된 코드
Call stack에서 자동 생성된 코드가 차지하는 비중이 큽니다. 반복되는 동일한 기능을 다루는 부분들은 자동 생성된 코드를 활용합니다. 코드 생성은 빌드 타임에 일어나며, 사람이 작성한 코드와 함께 빌드되어 바이너리나 Python 패키지가 만들어집니다.
자동 생성된 코드 목록 (10개 항목)
| # | Call Stack | 역할 |
|---|---|---|
| #5 | at:: at build/.../RegisterCUDA.cpp:12173 | CUDA backend dispatch 등록 - gen.py가 native_functions.yaml의 dispatch 항목으로부터 생성 |
| #12-13 | at::_ops::mm::redispatch at build/.../Operators_3.cpp:4010 | mm op의 redispatch 진입점 - Autograd → CUDA 전환 시 사용 |
| #14-15 | torch::autograd::VariableType::mm at generated/VariableType_3.cpp:13456 | mm의 Autograd kernel - gen_variable_type.py가 derivatives.yaml로부터 생성 |
| #23 | at::_ops::mm::call at build/.../Operators_3.cpp:4003 | mm op의 C++ dispatch 진입점 - dispatch key set 계산 및 Dispatcher 호출 |
| #27 | at:: at build/.../RegisterCompositeImplicitAutograd.cpp:2774 | matmul kernel 등록 - device 무관 composite kernel |
| #35 | at::_ops::matmul::call at build/.../Operators_4.cpp:3192 | matmul op의 C++ dispatch 진입점 |
| #37-38 | torch::autograd::THPVariable_matmul at generated/python_torch_functions_0.cpp:4911 | Python → C++ binding - gen_python_functions.py가 native_functions.yaml로부터 생성 |
자동 생성 파일의 구조
자동 생성되는 파일들과 이를 만들어 내는 도구, 그 도구의 입력이 무엇인지를 정리하면 다음과 같습니다. gen.py, gen_variable_type.py, gen_python_functions.py 같은 코드 생성 도구들이 native_functions.yaml과 derivatives.yaml을 입력으로 받아 아래와 같은 다양한 파일들을 생성합니다.
build/aten/src/ATen ← gen.py (input: native_functions.yaml)
ops/{operator}.h- op별 C++ frontend 선언core/TensorBody.h-at::Tensor클래스의 메서드 선언Operators.cpp- op별call/redispatch함수 구현Register{backend}.cpp- backend별 kernel 등록 코드. PyTorch가 초기화될 때 이 파일들이 각 backend의 kernel을 Dispatcher에 등록합니다.{backend}에는CUDA,CPU,XPU등 다양한 종류가 들어갈 수 있습니다.
torch/include/torch/csrc/autograd/generated ← tools/autograd의 생성 스크립트들 (gen_autograd.py가 orchestration; input: derivatives.yaml, native_functions.yaml)
Functions.h,python_functions.h,python_return_types.hvariable_factories.h,VariableType.h,ViewFuncs.h
torch/csrc/autograd/generated
VariableType.cpp←gen_variable_type.py(input:derivatives.yaml,native_functions.yaml)Functions.cpp←gen_autograd_functions.py(input:derivatives.yaml)python_functions.cpp←gen_autograd_functions.py(input:derivatives.yaml)python_torch_functions.cpp←gen_python_functions.py(input:native_functions.yaml)
핵심 입력 파일
native_functions.yaml- PyTorch가 기본으로 제공하는 op들의 스펙을 기술한 파일입니다. 각 op의 이름, 인자, 반환 타입, 지원하는 backend별 구현 함수 등이 정의되어 있으며, ATen op 정의 및 등록의 기반이 됩니다. PyTorch internal의 가장 핵심적인 패턴을 형성하는 역할을 하며, ATen을 위한 기술(description)이라고 볼 수 있습니다.derivatives.yaml- 각 op의 autograd 미분 규칙을 정의한 파일입니다.
이 입력 파일들을 코드 생성 도구가 가공하여 위에 나열된 다양한 C++ 파일들을 생성합니다. 생성된 코드는 빌드 타임에 사람이 직접 작성한 코드와 함께 컴파일되며, PyTorch 프로세스가 시작될 때 초기화 과정에서 생성된 backend들이 Dispatcher에 registration됩니다. 이 registration이 완료되어야 Dispatcher가 런타임에 올바른 kernel을 찾아 호출할 수 있습니다.
Dispatch Logic
Dispatch logic은 call stack에서 반복적으로 등장하며, 템플릿으로 구현된 반복 패턴입니다. 어떤 op이 실행될 때, 그 op이 어떤 조건에서 어떤 일을 해야 하는지를 결정하는 과정이 있으며, 이를 위해 dispatch key와 dispatch key set이라는 개념이 사용됩니다. Key set을 뽑은 뒤 Dispatcher에게 물어보면, 등록된 구현체를 찾아 호출합니다.
Dispatch logic 반복 패턴 (6회)
| # | Call Stack | 역할 |
|---|---|---|
| #6-9 | WrapFunctionIntoFunctor → KernelFunction::call at boxing/*.h | CUDA kernel dispatch - CUDA backend로 등록된 mm kernel을 functor로 감싸서 실행 |
| #10-13 | Dispatcher::redispatch → mm::redispatch at Dispatcher.h → Operators_3.cpp | Redispatch - Autograd 처리 후 다음 dispatch key(CUDA)로 mm을 재전달 |
| #16-19 | WrapFunctionIntoFunctor → KernelFunction::call at boxing/*.h | Autograd kernel dispatch - Autograd key로 등록된 mm의 VariableType kernel 실행 |
| #20-23 | Dispatcher::call → mm::call → Tensor::mm at Dispatcher.h → Operators_3.cpp | mm dispatch 진입 - dispatch key set에서 최우선 key(Autograd) 선택 후 kernel 호출 |
| #28-31 | WrapFunctionIntoFunctor → KernelFunction::call at boxing/*.h | matmul kernel dispatch - CompositeImplicitAutograd key로 등록된 matmul kernel 실행 |
| #32-35 | Dispatcher::call → matmul::call → Tensor::matmul at Dispatcher.h → Operators_4.cpp | matmul dispatch 진입 - dispatch key set에서 CompositeImplicitAutograd 선택 후 kernel 호출 |
간단해 보이는 matmul 하나를 수행하는데도 dispatch가 세 번 반복되는 것을 볼 수 있습니다.
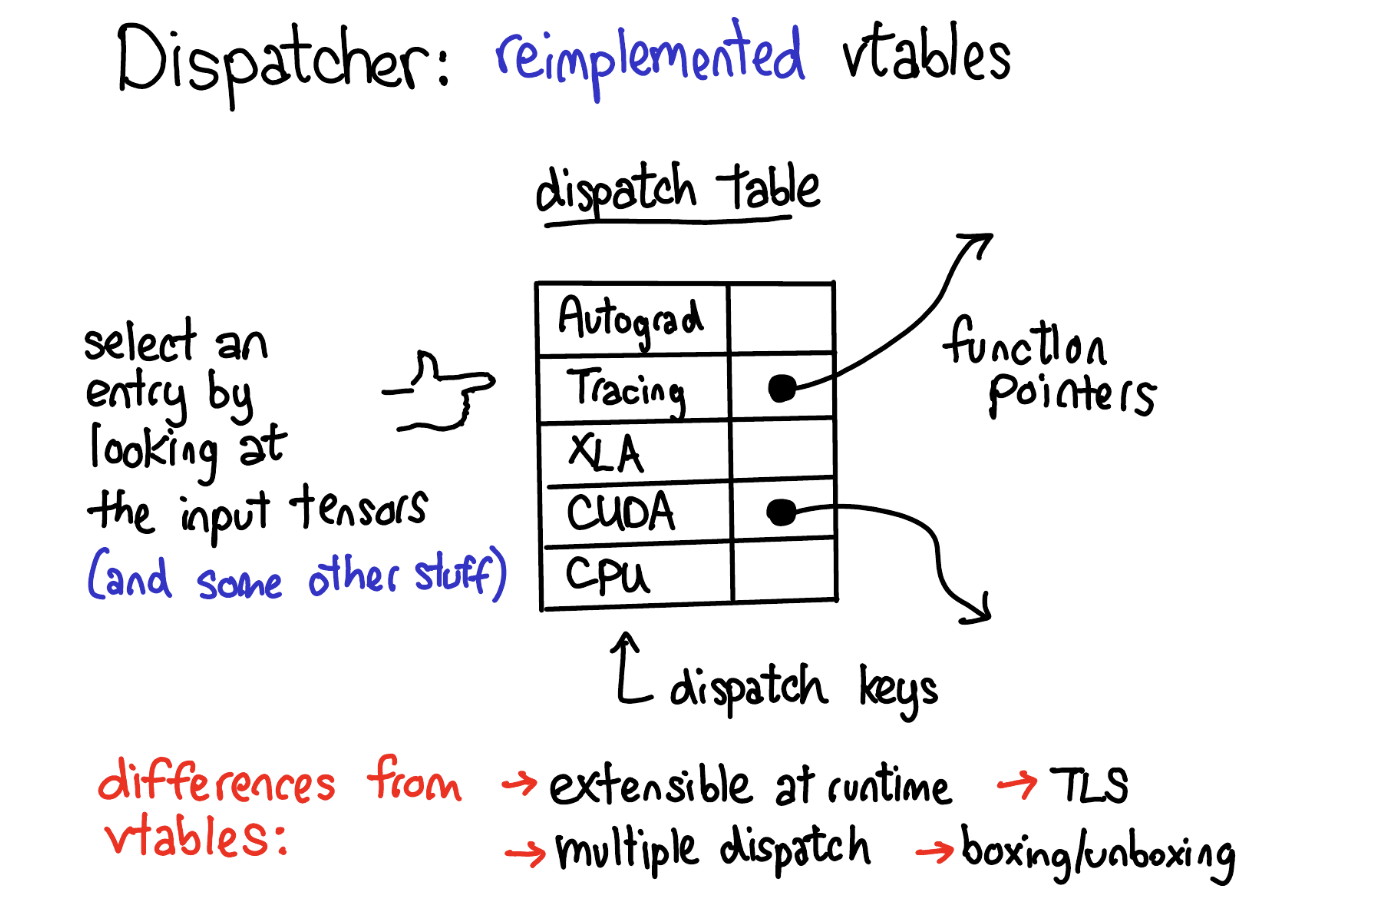
PyTorch Dispatcher
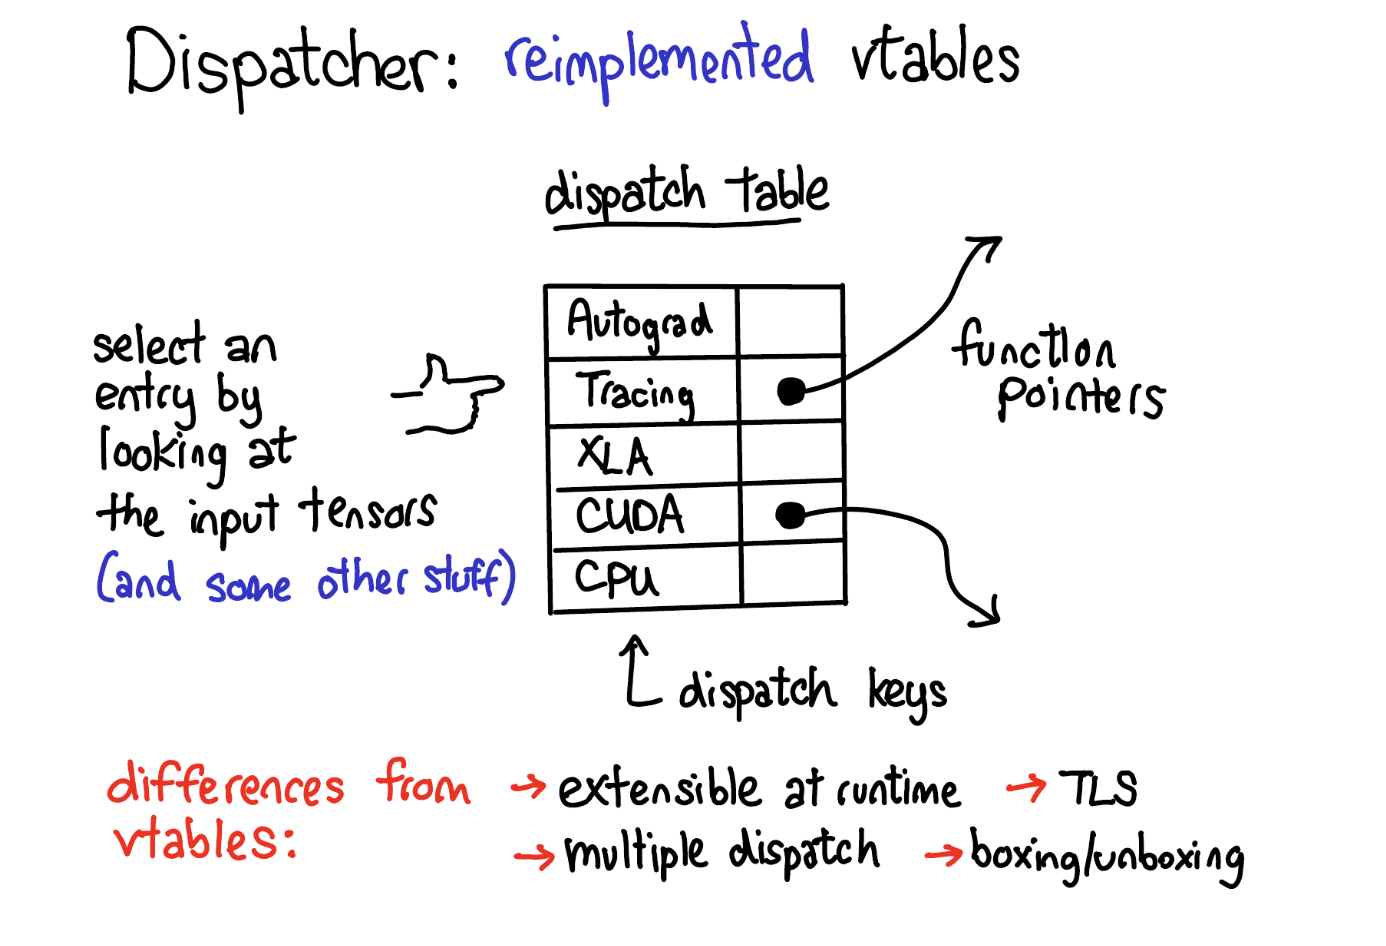
Edward Z. Yang(Meta)이 구현한 Dispatcher는 C++의 virtual function table(V-table)과 비슷한 개념이지만, 훨씬 더 복잡한 요구사항을 다룹니다. 같은 matmul이라도 CPU에서 실행될 때, CUDA에서 실행될 때, autograd가 켜져 있을 때 등 서로 다른 컨텍스트에서 다르게 동작해야 하는 모든 경우를 처리하기 위해, 별도의 데이터 구조와 알고리즘으로 설계되었습니다.
Dispatch table에는 각 key에 해당하는 function pointer가 들어 있습니다. 중요한 점은 하나의 key만이 아니라 여러 개의 key가 동시에 유효하도록 설계되어 있다는 것입니다. 이것이 바로 dispatch key set의 개념이며, Dispatcher는 이 key set에서 우선순위가 가장 높은 key를 선택하여 해당 kernel을 호출하고, 처리가 끝나면 다음 key로 redispatch하는 과정을 반복합니다.
상세 설명: http://blog.ezyang.com/2020/09/lets-talk-about-the-pytorch-dispatcher/
Call Stack을 단계별로 구분
개발자가 직접 작성한 부분
Call stack이 55단계나 되니 엄청나게 복잡한 구조라고 생각할 수 있지만, 실제로는 많은 부분이 자동 생성된 코드이거나 반복적으로 수행되는 dispatcher logic입니다. 이러한 요소들을 제외하고 나면, 개발자가 실제로 신경 써서 작성해야 하는 코드는 생각보다 적습니다. 남은 부분은 크게 두 가지인데, 하나는 matmul이 input shape에 따라 적절한 연산을 선택하는 비교적 일반적인 코드(#25-26)이고, 다른 하나는 CUDA에서 mm operator가 실행되기 위해 필요한 device-specific 구현(#0-4)입니다. 이처럼 실제 mm operator와 밀접하게 연관된 함수들은 관리할 수 있을 정도로 간소화됩니다.
개발자가 직접 작성한 코드 vs 자동 생성/dispatch 코드
| # | Call Stack | 구분 |
|---|---|---|
| #0 | at::cuda::blas::gemm<float> at CUDABlas.cpp:1127 | CUDA로 구현된 mm - cuBLAS GEMM 호출 |
| #1-3 | operator at native/cuda/Blas.cpp:457 | CUDA mm 내부 구현 |
| #4 | at::native::structured_mm_out_cuda::impl at native/cuda/Blas.cpp:604 | CUDA mm 구현체 |
| #5 | at:: at build/.../RegisterCUDA.cpp:12173 | (자동생성) |
| #6-9 | dispatch logic | |
| #10-13 | redispatch logic | |
| #14-15 | VariableType (autograd) | (자동생성) |
| #16-19 | dispatch logic | |
| #20-24 | Dispatcher::call → Tensor::mm | |
| #25 | at::native::_matmul_impl at LinearAlgebra.cpp:2031 | matmul 구현체 - input shape에 따라 mm, bmm 등으로 분기 |
| #26 | at::native::matmul at LinearAlgebra.cpp:2181 | matmul 진입점 |
| #27 | at:: at RegisterCompositeImplicitAutograd.cpp:2774 | (자동생성) |
| #28-35 | dispatch logic | |
| #36 | at::Tensor::matmul | |
| #37-38 | THPVariable_matmul | (자동생성, Python binding) |
| #39-54 | CPython / libc |
전체 과정 요약
Call Stack 전체 과정: 8단계
| 단계 | Call Stack | 역할 |
|---|---|---|
| 1 | #54-52: __libc_start_main → Py_BytesMain | libc가 Python 프로세스를 실행 |
| 2 | #51-39: Py_RunMain → cfunction_call | Python이 PyTorch를 Python 수준에서 처리 |
| 3 | #38-36: THPVariable_matmul → Tensor::matmul | Python에서 C++ code로 넘어가는 과정 - 자동 생성된 Python binding을 통해 진입 |
| 4 | #35-27: matmul::call → RegisterCompositeImplicitAutograd | matmul kernel을 dispatch하는 과정 - Dispatcher가 CompositeImplicitAutograd key로 matmul kernel 선택 |
| 5 | #26-24: matmul → _matmul_impl → Tensor::mm | matmul(mm)을 처리하는 과정 - input shape 분석 후 2D×2D이므로 mm을 호출 |
| 6 | #23-15: mm::call → VariableType::mm | mm의 autograd kernel을 dispatch하여 수행하는 과정 - backward graph 세팅 후 redispatch |
| 7 | #14-5: mm::redispatch → RegisterCUDA | mm의 CUDA kernel을 dispatch하여 수행하는 과정 - Autograd 처리 후 CUDA key로 redispatch |
| 8 | #4-0: structured_mm_out_cuda::impl → gemm<float> | cuBLAS로 진입하는 과정 - 최종적으로 GPU에서 행렬곱 수행 |
Python에서 C++ code로 넘어가는 과정
#36 at::Tensor::matmul
    at build/aten/src/ATen/core/TensorBody.h:2899
#37 operator
    at torch/csrc/autograd/generated/python_torch_functions_0.cpp:4909
#38 torch::autograd::THPVariable_matmul
    at torch/csrc/autograd/generated/python_torch_functions_0.cpp:4911
#39 cfunction_call
    at .../Objects/methodobject.c:540
#40 _PyObject_MakeTpCall
    at .../Objects/call.c:242
PyTorch는 성능과 확장성 요구사항을 충족하기 위해 자체 custom binding 기술을 사용합니다. 자동화된 코드 생성과 dispatcher 메커니즘으로 CPU, CUDA, XPU 같은 여러 backend를 지원합니다.
generate_code.py가 native_functions.yaml을 읽고 Python/C++ 간 인터페이스 코드를 생성합니다:
python_torch_functions.cpp: torch 함수의 정의 (예:torch.matmul은THPVariable_matmul로 연결)python_variable_methods.cpp:torch.Tensor에 대한 method 정의
참고: https://discuss.pytorch.org/t/how-are-python-bindings-created/46453
native_functions.yaml
native_functions.yaml은 사람이 직접 작성하는 파일로, ATen library의 operator를 정의하고 등록하는 전체 딕셔너리 역할을 합니다. GitHub 저장소나 PyTorch 소스를 빌드하면 확인할 수 있습니다. 이 파일은 dispatcher와 밀접하게 연관되어 backend별 kernel과 autograd 관련 기능들을 설정할 수 있으며, Python 인터페이스와 C++ 구현도 이 파일을 기준으로 연결됩니다. generate_code.py 같은 코드 생성 도구들이 이 파일의 정보를 바탕으로 실제 코드를 생성합니다.
- func: add.Tensor(Tensor self, Tensor other, *, Scalar alpha=1) -> Tensor
  device_check: NoCheck         # 디바이스 검사를 비활성화
  structured_delegate: add.out  # add.out의 정의를 상속
  variants: function, method    # namespace 함수 + Tensor 메서드
  dispatch:
    SparseCPU, SparseCUDA, SparseMeta: add_sparse
    SparseCsrCPU, SparseCsrCUDA, SparseCsrMeta: add_sparse_csr
    MkldnnCPU: mkldnn_add
    ZeroTensor: add_zerotensor
    NestedTensorCPU, NestedTensorCUDA: NestedTensor_add_Tensor
tags: [core, pointwise]func: add 함수의 signature 정의 - 이름, 인자, 반환 타입을 지정device_check: NoCheck: 디바이스 검사를 비활성화 - 전달받은 모든 tensor가 동일한 디바이스에 있는지 검사하지 않도록 함structured_delegate: add.out:add.out의 정의를 상속받음variants:function(namespace 안에서 호출, 예:torch.add()) /method(Tensor의 메서드로 호출, 예:a.add())dispatch: dispatch key 또는 backend별 impl 함수 지정 - Sparse, MKL-DNN, NestedTensor 등 각 backend에 맞는 구현 함수를 매핑
matmul kernel을 dispatch하는 과정
#35 at::_ops::matmul::call           ← Op의 C++ frontend
#34 c10::TypedOperatorHandle<...>
#33 c10::Dispatcher::call<...>       ← Dispatch logic
#32 c10::Dispatcher::callWithDispatchKeySlowPath<...>
#31 c10::KernelFunction::call<...>
#30 c10::callUnboxedKernelFunction<...>
#29 c10::impl::wrap_kernel_functor_unboxed_<...>
#28 c10::impl::detail::WrapFunctionIntoFunctor_<...>
#27 at:: at RegisterCompositeImplicitAutograd.cpp  ← matmul kernel
#26 at::native::matmul
Python에서 C++로 넘어온 뒤, 이제 matmul operator의 kernel을 dispatch하는 과정을 살펴봅니다.
먼저 Op의 C++ frontend (#35)가 어떤 op을 수행할지 결정하고, C++ 수준에서 dispatch key set을 계산하여 Dispatcher table에서 해당 kernel을 찾아 호출합니다. 이 과정을 거쳐 실제 matmul kernel이 실행됩니다.
여기서 주목할 점은 #27의 RegisterCompositeImplicitAutograd입니다.
CompositeImplicitAutograd란?
matmul은 input tensor의 shape에 따라 dot, mv, mm, bmm 등 미분 가능한 함수들의 시퀀스로 표현될 수 있습니다. 이 경우 matmul 자체에 대한 미분 규칙을 별도로 정의할 필요가 없습니다. 내부에서 호출되는 각 함수들이 이미 autograd kernel을 갖고 있으므로, 전체 미분은 이들의 합성으로 자동 처리됩니다.
이러한 방식을 CompositeImplicitAutograd라고 합니다. 이 dispatch key로 등록된 kernel은 autograd에 특화된 별도의 kernel이 아니라, forward 계산을 수행하는 kernel이 그대로 사용됩니다. Forward 실행 과정에서 내부적으로 호출되는 개별 op들이 각자의 autograd kernel로 backward graph를 구성하므로, 별도의 미분 정의 없이도 backward 계산이 이루어집니다. 해당 등록 코드는 RegisterCompositeImplicitAutograd.cpp에 들어 있으며, 이 파일은 코드 생성 도구가 자동으로 생성합니다.
matmul을 처리하는 과정
실제 matmul operator를 처리하는 코드는 aten/src/ATen/native/LinearAlgebra.cpp에 구현되어 있습니다. matmul은 여러 input 조합에 대해 일반적으로 동작하도록 설계되어 있어, input tensor의 차원에 따라 어떤 연산을 수행할지 결정합니다. 이번 예제에서는 2D × 2D이므로, 결국 mm을 호출하여 2D 매트릭스 곱셈 연산을 dispatch하게 됩니다.
#24 at::Tensor::mm at build/aten/src/ATen/core/TensorBody.h:2999
#25 at::native::_matmul_impl at aten/src/ATen/native/LinearAlgebra.cpp:2031  ← ★ mm 호출
#26 at::native::matmul at aten/src/ATen/native/LinearAlgebra.cpp:2181torch.matmul은 input tensor의 차원에 따라 다른 연산을 수행합니다:
- If both tensors are 1-dimensional, the dot product (scalar) is returned.
- If both arguments are 2-dimensional, the matrix-matrix product is returned. (이번 예제에 해당)
- If the first argument is 1-dimensional and the second argument is 2-dimensional, a 1 is prepended to its dimension for the purpose of the matrix multiply. After the matrix multiply, the prepended dimension is removed.
- If the first argument is 2-dimensional and the second argument is 1-dimensional, the matrix-vector product is returned.
- If both arguments are at least 1-dimensional and at least one argument is N-dimensional (where N > 2), then a batched matrix multiply is returned. If the first argument is 1-dimensional, a 1 is prepended to its dimension for the purpose of the batched matrix multiply and removed after. If the second argument is 1-dimensional, a 1 is appended to its dimension for the purpose of the batched matrix multiply and removed after. The first N-2 dimensions of each argument, the batch dimensions, are broadcast (and thus must be broadcastable).
mm의 autograd kernel을 dispatch
Dispatch logic이 한 번 더 수행되어, mm 작업을 처리하는 kernel을 선택합니다. 여기서 autograd 역할을 하는 kernel이 호출되는 것을 볼 수 있습니다 (#15). 해당 구현체는 자동 생성된 코드로, 빌드하면 torch/csrc/autograd/generated/VariableType_3.cpp에 들어 있습니다. 숫자 3은 코드가 매우 길어 한 파일에 담기 어려워 임의로 분할된 결과입니다. 이 dispatch logic은 앞서 본 matmul dispatch와 거의 동일한 방식으로 반복적으로 일어납니다.
#15 torch::autograd::VariableType:: at .../VariableType_3.cpp:13456  ← ★ Autograd kernel
#16-19 (dispatch logic: WrapFunctionIntoFunctor → KernelFunction::call)
#20    c10::Dispatcher::callWithDispatchKeySlowPath<...>
#21    c10::Dispatcher::call<...>
#22    c10::TypedOperatorHandle<...>
#23    at::_ops::mm::call at build/.../Operators_3.cpp:4003
#24    at::Tensor::mm at build/.../TensorBody.h:2999
Autograd kernel이란?
GPU에서 연산을 실행하면 CUDA kernel이 사용되고, 학습을 위해 함수가 호출되면 동적 계산 그래프(dynamic computation graph)가 생성되어야 합니다. 이 두 기능(CUDA 실행과 autograd)은 dispatch table에서 적절히 연결됩니다. Dispatch key set이 생성되면 우선순위가 가장 높은 key가 선택되어 실행되는데, autograd key가 CUDA key보다 우선순위가 높으므로 autograd kernel이 먼저 실행됩니다.
Autograd kernel은 실제 backward 계산을 수행하지 않습니다. 대신 forward 계산을 하면서 동적 계산 그래프를 업데이트하는 역할을 합니다. 구체적으로는:
compute_requires_grad()같은 조건을 판별하여, 필요한 경우 backward 계산을 위한 그래프 노드를 추가- Forward 함수 실행 전후에 sanity check 수행
- 실제 연산은 dispatch table에서 다음 key(예: CUDA)로 redispatch하여 수행
이는 PyTorch의 define-by-run 방식과 관련이 있습니다. 그래프를 미리 정의하고 실행하는 define-and-run 방식과 달리, PyTorch는 eager mode에서 연산을 하나하나 즉시 실행합니다. 이 과정에서 각 연산이 수행될 때마다 autograd kernel이 동적 계산 그래프를 자동으로 생성하고, 후속 backward 계산을 위한 히스토리를 기록합니다.
자동 생성된 Autograd kernel 예제 (old style add):
// In VariableTypeEverything.cpp

Tensor add_Tensor(const Tensor & self, const Tensor & other, Scalar alpha) {
    auto& self_ = unpack(self, "self", 0);
    auto& other_ = unpack(other, "other", 1);
    std::shared_ptr<AddBackward0> grad_fn;
    if (compute_requires_grad( self, other )) {
        grad_fn = std::shared_ptr<AddBackward0>(new AddBackward0(), deleteNode);
        grad_fn->set_next_edges(collect_next_edges( self, other ));
        grad_fn->alpha = alpha;
    }
    #ifndef NDEBUG
    c10::optional<Storage> self__storage_saved =
        self_.has_storage() ? c10::optional<Storage>(self_.storage()) : c10::nullopt;
    c10::intrusive_ptr<TensorImpl> self__impl_saved;
    if (self_.defined()) self__impl_saved = self_.getIntrusivePtr();
    c10::optional<Storage> other__storage_saved =
        other_.has_storage() ? c10::optional<Storage>(other_.storage()) : c10::nullopt;
    c10::intrusive_ptr<TensorImpl> other__impl_saved;
    if (other_.defined()) other__impl_saved = other_.getIntrusivePtr();
    #endif
    auto tmp = ([&]() {
        at::AutoNonVariableTypeMode non_var_type_mode(true);
        return at::add(self_, other_, alpha);
    })();
    auto result = std::move(tmp);
    #ifndef NDEBUG
    if (self__storage_saved.has_value())
        AT_ASSERT(self__storage_saved.value().is_alias_of(self_.storage()));
    if (self__impl_saved) AT_ASSERT(self__impl_saved == self_.getIntrusivePtr());
    if (other__storage_saved.has_value())
        AT_ASSERT(other__storage_saved.value().is_alias_of(other_.storage()));
    if (other__impl_saved) AT_ASSERT(other__impl_saved == other_.getIntrusivePtr());
    #endif
    if (grad_fn) {
        set_history(flatten_tensor_args( result ), grad_fn);
    }
    return result;
}gen_variable_type.py가 derivatives.yaml로부터 생성한 코드로, gradient가 필요한 경우 backward graph를 update하고 forward 함수를 redispatch합니다.
mm의 CUDA kernel을 dispatch
#4  at::native::structured_mm_out_cuda::impl
    at aten/src/ATen/native/cuda/Blas.cpp:604
#5  at:: at build/aten/src/ATen/RegisterCUDA.cpp:12173
#6-9  (dispatch logic)
#10 c10::Dispatcher::redispatch<...>   ← Redispatch!
#11 c10::TypedOperatorHandle<...>
#12 at::_ops::mm::redispatch
#13 at::redispatch::mm
#14-15 (from autograd VariableType)
핵심 개념
- Redispatch: Autograd kernel이 실행된 후, 다음 dispatch key로 재전달
- RegisterCUDA.cpp:
native_functions.yaml에서 생성된 CUDA backend 등록 코드
RegisterCUDA.cpp와 관련된 native_functions.yaml
RegisterCUDA.cpp에 등록되는 CUDA kernel이 native_functions.yaml에서 어떻게 정의되어 있는지를 보면, mm op의 구조를 이해할 수 있습니다. mm은 mm.out으로 delegate하고, mm.out은 structured: True로 정의되어 있어 structured kernel 방식으로 구현됩니다. dispatch 항목에서 CUDA: mm_out_cuda로 지정된 부분이 코드 생성 도구에 의해 RegisterCUDA.cpp에 등록되는 CUDA backend kernel입니다.
- func: mm(Tensor self, Tensor mat2) -> Tensor
  structured_delegate: mm.out     # mm.out의 정의를 상속
  variants: function, method
  dispatch:
    SparseCPU, SparseCUDA: _sparse_mm
    SparseCsrCPU, SparseCsrCUDA, SparseCsrMeta: _sparse_csr_mm
  tags: core

- func: mm.out(Tensor self, Tensor mat2, *, Tensor(a!) out) -> Tensor(a!)
  structured: True                # ← ★ structured kernel 방식으로 구현
  dispatch:
    CPU: mm_out_cpu
    CUDA: mm_out_cuda             # ← 이것이 RegisterCUDA.cpp에 등록됨
    MPS: mm_out_mps
    XPU: mm_out_xpu
    SparseCPU, SparseCUDA: _sparse_mm_out
    SparseCsrCPU, SparseCsrCUDA, SparseCsrMeta: _sparse_csr_mm_out
cuBLAS로 진입하는 과정
Call stack의 최상위에서 실제로 cuBLAS로 진입하는 과정이 발생합니다. 여기서 structured라고 표시된 부분은 native_functions.yaml의 structured: True 태그와 동일한 의미입니다. Structured kernel은 입력과 출력 텐서를 다룰 때 텐서의 구성 방식과 sanity check을 어떻게 수행할지에 대한 특정 패턴을 정의하고, 그 패턴에 맞춰 구현체가 만들어집니다. 실제 구현체가 호출되기 전에 이를 래핑하는 자동 생성된 코드가 입력 텐서의 sanity를 체크하고, structured kernel이 처리할 수 있도록 준비합니다. 개발자는 이 잘 정리된 형태의 kernel 구현체만 작성하면 되고, 나머지 껍데기 부분은 코드 생성 도구가 자동으로 만들어 냅니다.
#0 at::cuda::blas::gemm<float>
   at aten/src/ATen/cuda/CUDABlas.cpp:1127
...
#4 at::native::structured_mm_out_cuda::impl
at aten/src/ATen/native/cuda/Blas.cpp:604 # ← ★ structured kernel#4의 structured_mm_out_cuda::impl이 CUDA mm의 structured kernel 구현체입니다. 이 함수가 호출되기까지의 과정을 코드로 따라가면 다음과 같습니다:
1단계: TORCH_IMPL_FUNC 매크로. structured kernel의 진입점. mm은 bias가 없는 addmm의 특수한 경우이므로, beta=0으로 addmm_out_cuda_impl에 위임합니다.
// aten/src/ATen/native/cuda/Blas.cpp
TORCH_IMPL_FUNC(mm_out_cuda)(const Tensor& self, const Tensor& mat2,
    const Tensor& result) {
    // NOLINTNEXTLINE(cppcoreguidelines-pro-type-const-cast)
    addmm_out_cuda_impl(const_cast<Tensor&>(result), result, self, mat2, 0, 1);
}
2단계: addmm_out_cuda_impl. 입력 검증 후 cuBLAS 호출 준비
Tensor& addmm_out_cuda_impl(Tensor& result, const Tensor& self,
    const Tensor& mat1, const Tensor& mat2, const Scalar& beta,
    const Scalar& alpha, Activation activation=Activation::None,
    bool disable_addmm_cuda_lt_override=false) {
  // Shape checks {
  // Make sure to keep addmm_cuda below in sync with this code; it
  // preflights a check to try to avoid actually needing to call
  // expand().
  TORCH_CHECK(mat1.dim() == 2 && mat2.dim() == 2, "tensors must be 2-D");
  TORCH_CHECK(
    mat1.dtype() == mat2.dtype(),
    "expected mat1 and mat2 to have the same dtype, but got: ",
    mat1.dtype(), " != ", mat2.dtype()
  )
  ...
}
3단계: cuBLAS GEMM 호출. 최종적으로 GPU에서 행렬곱을 수행합니다. addmm_out_cuda_impl은 조건에 따라 일반 cuBLAS 경로인 at::cuda::blas::gemm(위 call stack의 #0이 이 경로) 또는 아래와 같은 cublasLt 기반의 gemm_and_bias를 호출합니다.
at::cuda::blas::gemm_and_bias<scalar_t>(
    args.transa == 't',
    args.transb == 't',
    args.m,
    args.n,
    args.k,
    alpha.to<at::opmath_type<scalar_t>>(),
    args.mata->const_data_ptr<scalar_t>(),
    args.lda,
    args.matb->const_data_ptr<scalar_t>(),
    args.ldb,
    // This condition is needed for mm case on ROCm for hipblasLt path.
    // Passing the bias ptr as null to avoid accuracy issues for mm case.
    (&result != &self) ? self.const_data_ptr<scalar_t>() : nullptr,
    args.result->data_ptr<scalar_t>(),
    args.result_ld,
    activation_to_gemm_and_blas_arg(activation)
);
최종적으로 cublasGemmEx 또는 cublasSgemm 같은 cuBLAS 함수가 호출됩니다.
참고: https://github.com/pytorch/pytorch/blob/main/aten/src/ATen/native/cuda/Blas.cpp
Eager Mode에 대한 Detail
지금까지 torch.matmul 예제로 Operator가 dispatch되고 실행되는 전체 흐름을 살펴보았습니다. 이제부터는 Eager mode를 구성하는 세 가지 핵심 요소인 Tensor, Operator, Runtime을 각각 상세히 살펴봅니다.
Tensor
Operator에 대해서는 앞서 충분히 다뤘으므로, 이제 operator의 입출력이 되는 tensor가 내부적으로 어떻게 구성되는지 살펴봅니다. Tensor는 Python과 C++ 양쪽에서 동일하게 표현되어야 하고, GPU 등 다양한 device의 memory 할당까지 고려해야 하기 때문에 설계가 단순하지 않습니다.
Tensor의 구조
참고: PyTorch internals (Edward Z. Yang)
PyTorch 내부에서 대부분의 구현은 C++로 되어 있습니다. Python의 torch.tensor는 내부적으로 at::Tensor라는 C++ 객체에 대응되며, 이 객체는 c10::TensorImpl이라는 구현체(impl)를 통해 대부분의 정보를 관리합니다.
at::Tensor-c10::TensorImpl을intrusive_ptr로 가리키는 얇은 wrapperc10::TensorImpl- 실제 구현체로, 핵심 정보를 가짐:c10::Storage: 실제 data가 저장되는 공간.- 예를 들어 GPU에 메모리가 할당되면, 그 메모리 덩어리가 이
StorageImpl과 1:1로 매핑됨. intrusive_ptr로 관리되므로 여러 tensor가 같은 storage를 공유할 수 있으며, 이것이 view의 핵심- view를 생성하면 새 storage가 아닌 기존 storage를 공유하면서 metadata만 다른 tensor가 만들어짐
- 예를 들어 GPU에 메모리가 할당되면, 그 메모리 덩어리가 이
metadata- sizes, strides, storage offset, dtype, device. Stride를 이용해tensor[i][j]를data_ptr[i * stride[0] + j * stride[1]]로 접근AutogradMeta- gradient,grad_fn등 autograd 관련 bookkeeping 정보를 tensor 단위로 저장.requires_grad=False이면 null로 최적화됨
Tensor의 Lifecycle
Tensor의 lifecycle은 생성, 소멸, 복사의 세 가지 과정으로 나눌 수 있습니다.
생성 - scratch로 새로 만드는 경우:
aten/src/ATen/native/TensorFactories.cpp에 구현된 함수들을 통해 생성empty(),zeros(),ones()등
생성 - 기존 tensor로부터 파생되는 경우:
기존 tensor로부터 파생될 때는 두 가지로 나뉩니다. 별도의 storage를 갖는 경우와, 기존 tensor의 storage를 공유하는 경우입니다. Storage를 공유하는 것이 바로 view이며, 이때 새 storage가 생성되지 않고 intrusive_ptr로 reference만 공유하여 reference count가 증가합니다.
Storage를 새로 만드는 경우
at::native::clone()(TensorFactories.cpp)을 통한 복제본 생성- 별도의
c10::Storage를 가진at::Tensor - metadata와 실제 data는
at::native::copy_()로 복제
Storage를 기존 tensor와 공유하는 경우 (view)
aten/src/ATen/native/TensorShape.cpp에 구현된 함수로 view 생성at::native::alias_with_sizes_and_strides()등- 명시적으로
clone()을 호출하지 않는 한 대부분 이 경우에 해당 at::Tensor는 새로 만들지만c10::Storage는intrusive_ptr로 공유
소멸:
Tensor가 소멸된다고 해서 storage까지 바로 소멸되지는 않습니다.
at::Tensor의 소멸:
- Python에서
torch.tensor가 제거되는 시점에 소멸- 명시적으로 객체를 제거 (
delkeyword 사용) - 또는 garbage collection에 의해 자연스럽게 소멸
- 명시적으로 객체를 제거 (
- Python 측 객체가 소멸되면 C++
at::Tensor와 내부 포인터들도 함께 해제 THPVariable_subclass_dealloc이 entry point
c10::Storage의 소멸:
intrusive_ptr의 reference count가 감소하지만, 다른 tensor(view 등)가 공유 중이면 바로 소멸되지 않음- Reference count가 0이 되는 시점에 비로소
StorageImpl과 실제 device memory가 정리됨
Tensor를 가지고 할 수 있는 일들
Tensor로 할 수 있는 일들은 모두 operator(op)에 해당하며, op의 동작 방식에 따라 다음과 같이 분류할 수 있습니다.
| 분류 | 예시 | |
|---|---|---|
| operator 수행 결과를 tensor에 직접 반영 → in-place operator | add_(), transpose_() | |
| operator 수행 결과로 새로운 tensor가 생성 | 실제 연산이 일어나는 경우 → 새로운 storage가 생김 | matmul(), add(), 산술 연산 |
| 기존 data의 재배치만 일어나는 경우 - view만 생기는 경우 | view(), transpose() | |
| 기존 data의 재배치만 일어나는 경우 - 새로운 storage가 생기는 경우 | clone(), non-contiguous tensor의 contiguous() |
단, 경계에 있는 op들도 있습니다. reshape()은 가능하면 view를 반환하지만 view로 표현할 수 없는 경우(예: non-contiguous tensor) copy를 만들고, contiguous()는 이미 contiguous한 tensor에 대해서는 복사 없이 자기 자신을 그대로 반환합니다.
In-place operator
>>> a = torch.tensor([[1., 2.], [3., 4.]])
>>> b = torch.tensor([[5., 6.], [7., 8.]])
>>> a.add_(b)
tensor([[ 6.,  8.], [10., 12.]])
>>> a.transpose_(0, 1)
tensor([[ 6., 10.], [ 8., 12.]])
새로운 storage 생성 (연산)
>>> c = torch.matmul(a, b)
>>> print(c)
tensor([[100., 116.], [124., 144.]])
>>> d = torch.add(c, 10)
>>> print(d)
tensor([[110., 126.], [134., 154.]])
View만 생성 (storage 공유)
>>> e = torch.reshape(d, (4, 1))
>>> print(e)
tensor([[110.], [126.], [134.], [154.]])
>>> f = torch.transpose(e, 0, 1)
>>> print(f)
tensor([[110., 126., 134., 154.]])
새로운 storage 생성 (재배치)
>>> g = d.clone()      # 새 storage에 복제
>>> t = d.t()          # non-contiguous view
>>> h = t.contiguous() # 새 storage에 재배치
>>> t.is_contiguous(), h.is_contiguous()
(False, True)
View와 Storage 분리
같은 data를 해석만 달리함으로써 변환하는 시간과 memory를 절약하는 것이 핵심 개념입니다:
- 같은 data를 다른 shape으로 해석 (reshape)
- 특정 차원을 반복해 접근 (broadcast)
TensorIterator는 View와 분리된 storage를 접근하기 위한 helper입니다:
at::Tensor my_add_cuda(const at::Tensor& ta, const at::Tensor& tb) {
    auto result = at::empty_like(ta);
    auto iter = at::TensorIteratorConfig()
        .add_output(result)
        .add_input(ta)
        .add_input(tb)
        .build();
    at::native::gpu_kernel(iter, []GPU_LAMBDA(float a, float b) {
        return a + b;
    });
    return result;
}
차원의 변경: 원소의 개수(각 차원 크기의 곱)는 같지만 각 차원의 크기가 다른 경우. Storage data는 변경되지 않고 metadata(size, stride)만 변경됩니다.
| Operator | 설명 | 예시 |
|---|---|---|
view() | 차원을 변경하며, stride를 자동 계산하여 설정 | x = torch.arange(6).view(2, 3) |
transpose() | 두 차원의 순서를 교환한 view 생성 | y = x.transpose(0, 1) |
permute() | 모든 차원의 순서를 재배한 view 생성 | y = x.permute(2, 0, 1) |
as_strided() | 차원과 stride를 직접 지정해 view 생성 | y = torch.as_strided(x, (2, 2), (1, 2)) |
차원의 축소: 특정 차원을 제거하거나 크기를 축소하는 경우 (예: (2, 3, 4) → (2, 12) 또는 (24,)). Storage는 공유하고 metadata만 변경됩니다.
| Operator | 설명 | 예시 |
|---|---|---|
flatten() | 지정 범위의 차원을 하나로 합침 | y = x.flatten(1, 2) |
squeeze() | 크기가 1인 차원을 제거 | y = x.squeeze(0) |
reshape() | 원소 수가 같은 새 shape으로 변환 (view가 불가능한 경우에는 copy) | y = x.reshape(2, 12) |
차원의 확장: 없는 차원을 추가하거나 크기가 1인 차원을 확장하는 경우 (예: (3, 4) → (1, 3, 4)). Storage는 공유하고 metadata만 변경됩니다.
| Operator | 설명 | 예시 |
|---|---|---|
unsqueeze() | 지정 위치에 크기 1인 차원을 추가 | y = x.unsqueeze(0) |
expand() | 크기가 1인 차원을 반복 없이 확장 | y = x.expand(3, 4) |
broadcast_to() | 목표 shape으로 broadcast | y = x.broadcast_to(2, 3, 4) |
Operator
Operator 실행과 관련된 핵심 개념들은 다음과 같습니다:
- Kernel - 실제 연산을 수행하는 구현체
- Dispatcher - op과 컨텍스트에 맞는 kernel을 찾아 호출하는 메커니즘
- Dispatch key - 어떤 kernel을 선택할지 결정하는 키
- Dispatch key set - 여러 dispatch key의 집합
- Registration - kernel을 dispatcher에 등록하는 과정
참고: http://blog.ezyang.com/2020/09/lets-talk-about-the-pytorch-dispatcher/
Kernel
Generated Autograd Kernel for add
// In VariableTypeEverything.cpp

Tensor add_Tensor(const Tensor & self, const Tensor & other, Scalar alpha) {
  auto& self_ = unpack(self, "self", 0);
  auto& other_ = unpack(other, "other", 1);
  std::shared_ptr<AddBackward0> grad_fn;
  if (compute_requires_grad( self, other )) {
    grad_fn = std::shared_ptr<AddBackward0>(new AddBackward0(), deleteNode);
    grad_fn->set_next_edges(collect_next_edges( self, other ));
    grad_fn->alpha = alpha;
  }
  #ifndef NDEBUG
  c10::optional<Storage> self__storage_saved =
    self_.has_storage() ? c10::optional<Storage>(self_.storage()) : c10::nullopt;
  c10::intrusive_ptr<TensorImpl> self__impl_saved;
  if (self_.defined()) self__impl_saved = self_.getIntrusivePtr();
  c10::optional<Storage> other__storage_saved =
    other_.has_storage() ? c10::optional<Storage>(other_.storage()) : c10::nullopt;
  c10::intrusive_ptr<TensorImpl> other__impl_saved;
  if (other_.defined()) other__impl_saved = other_.getIntrusivePtr();
  #endif
  auto tmp = ([&]() {
    at::AutoNonVariableTypeMode non_var_type_mode(true);
    return at::add(self_, other_, alpha);
  })();
  auto result = std::move(tmp);
  #ifndef NDEBUG
  if (self__storage_saved.has_value())
    AT_ASSERT(self__storage_saved.value().is_alias_of(self_.storage()));
  if (self__impl_saved) AT_ASSERT(self__impl_saved == self_.getIntrusivePtr());
  if (other__storage_saved.has_value())
    AT_ASSERT(other__storage_saved.value().is_alias_of(other_.storage()));
  if (other__impl_saved) AT_ASSERT(other__impl_saved == other_.getIntrusivePtr());
  #endif
  if (grad_fn) {
    set_history(flatten_tensor_args( result ), grad_fn);
  }
  return result;
}
Registration API
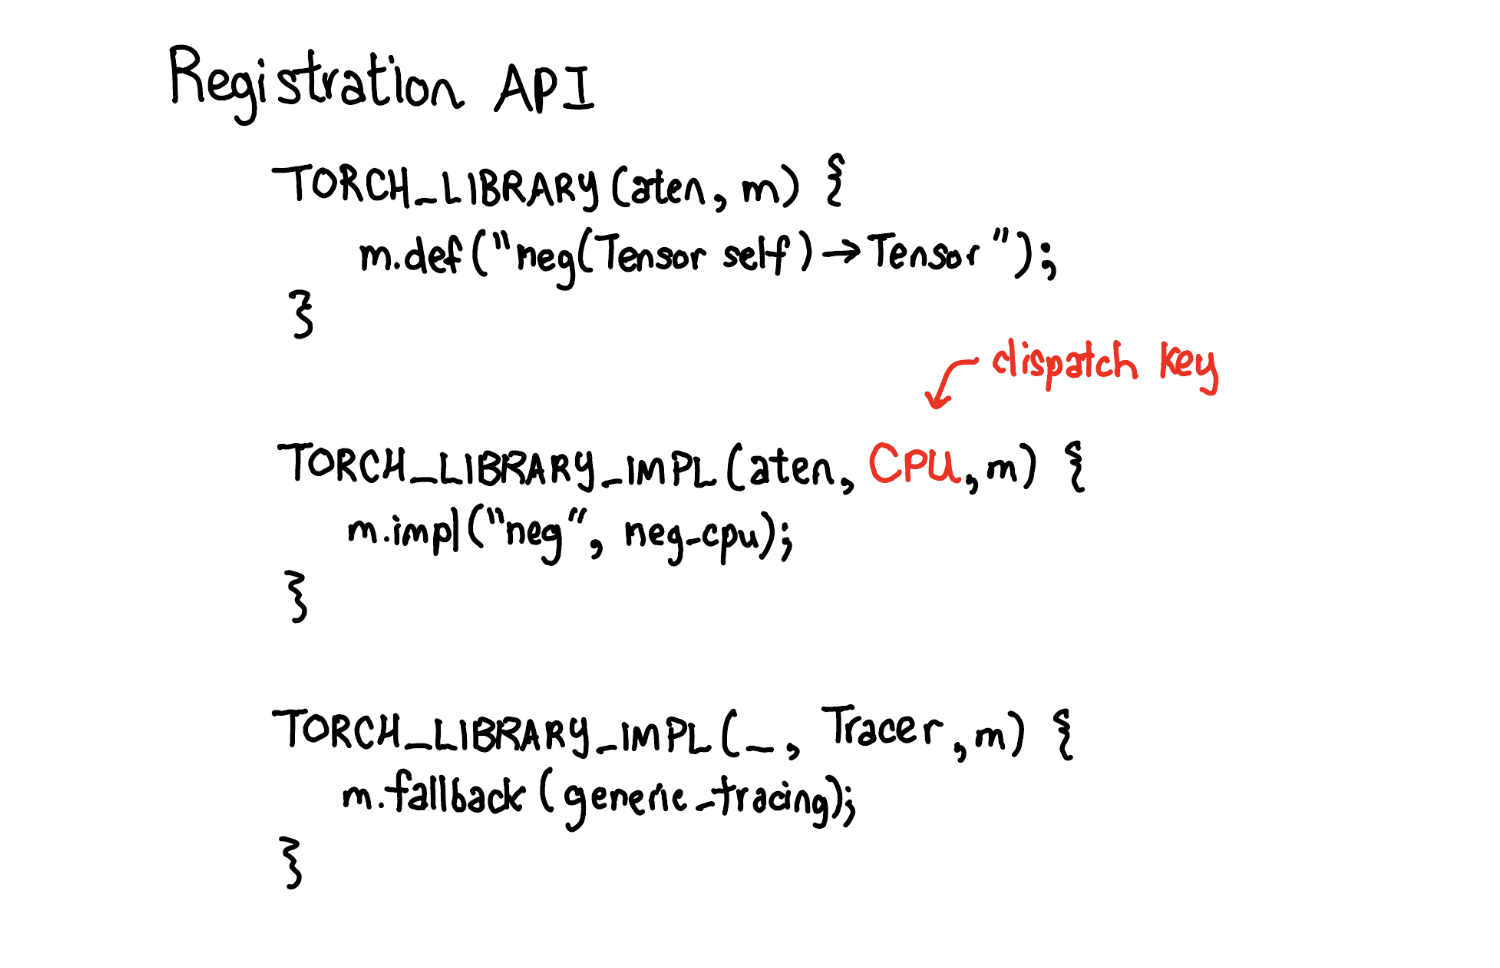
Dispatch table의 함수 포인터가 어떻게 등록되는지를 담당하는 것이 operator registration API입니다. 이 API와 상호작용하는 세 가지 주요 방법이 있습니다:
def- operator의 schema를 정의impl- 특정 dispatch key에 대한 구현(kernel)을 등록fallback- 특정 dispatch key의 모든 operator에 대한 기본 handler를 등록
- Kernel을 Dispatcher에 등록하는 API
Register{Backend}.cpp는gen.py가native_functions.yaml로부터 생성
참고: http://blog.ezyang.com/2020/09/lets-talk-about-the-pytorch-dispatcher/
Dispatcher
Dispatcher는 모든 operator마다 함수 포인터 테이블(dispatch table)을 유지합니다. 각 dispatch key는 PyTorch의 cross-cutting concern(백엔드, autograd, tracing 등)에 대응하며, 위 다이어그램에서 CPU, CUDA, XLA 같은 백엔드뿐 아니라 autograd, tracing 같은 상위 개념에 대한 dispatch entry도 볼 수 있습니다. Dispatcher는 입력 tensor와 기타 정보를 기반으로 dispatch key를 계산한 뒤, 해당 테이블의 함수 포인터로 indirect jump합니다.
C++ vtable과의 비교
Dispatch table은 C++의 virtual table과 유사하지만 중요한 차이점이 있습니다:
| C++ vtable | PyTorch Dispatch Table | |
|---|---|---|
| 할당 단위 | 클래스(class)별 | operator별 - 새 operator 추가 시 새 dispatch table만 할당하면 됨 |
| dispatch 기준 | 첫 번째 인자(this)만 고려 | 모든 인자(multiple dispatch) + thread-local state(TLS) 고려 |
| boxing/unboxing | 없음 | calling convention의 일부로 boxing/unboxing 지원 |
PyTorch에서 확장성의 핵심은 새로운 subclass를 만드는 것이 아니라 새로운 operator를 정의하는 것이므로, vtable 대신 이 방식이 더 적합합니다. 반면 dispatch key는 자유롭게 확장할 수 없으며, 새 dispatch key를 추가하려면 PyTorch core에 패치를 제출해야 합니다.
역사적으로 PyTorch는 원래 virtual method를 사용하여 dynamic dispatch를 구현했으나, vtable이 제공하는 것 이상의 유연성이 필요해지면서 현재의 dispatcher로 재구현했습니다.
Dispatch Key와 Dispatch Key Set
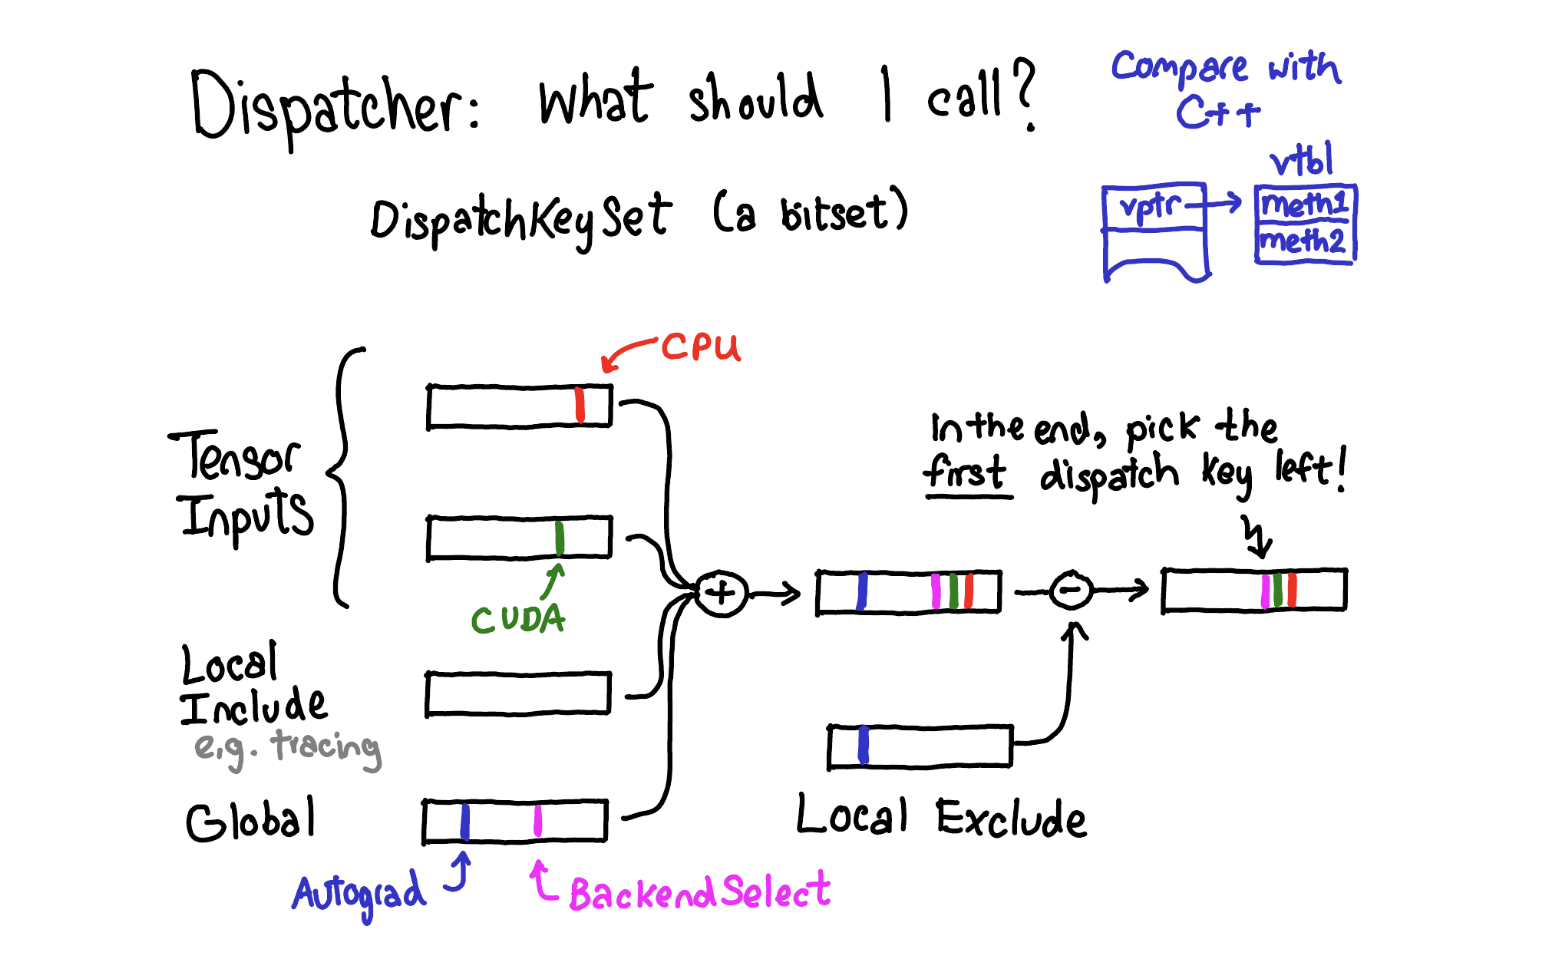
Dispatch table에서 어떤 dispatch key로 index할지를 결정하는 핵심 추상화가 dispatch key set입니다. Dispatch key set은 dispatch key들의 bitset으로, 여러 소스에서 가져온 dispatch key set을 union하고(일부는 mask out), 최종 dispatch key set에서 우선순위가 가장 높은 key를 선택하여 dispatch합니다.
Dispatch key set의 소스
| 소스 | 설명 |
|---|---|
| Tensor input | 각 입력 tensor가 자신의 dispatch key set을 기여 (예: CPU tensor → CPU key) |
| Local include set | tensor와 무관한 modal 기능 (예: tracing) - thread-local로 특정 scope 내에서 on/off |
| Global set | 항상 고려되는 dispatch key (참고: Autograd는 이후 global set에서 tensor로 이동됨) |
| Local exclude set | dispatch에서 제외할 key를 지정. handler가 자신의 key를 처리한 후 mask off하여 재처리를 방지하는 패턴에 사용 |
Dispatch Key Set이 정해지는 과정
1단계: 입력 tensor들로부터 dispatch key set 수집
template <typename... Args>
DispatchKeySet multi_dispatch_key_set(const Args&... args) {
  return MultiDispatchKeySet().apply(args...).ts;
}
2단계: backend fallthrough 여부에 따라 최종 dispatch key set 계산
template<class... Args>
DispatchKeySet getDispatchKeySetUnboxed(const Args&... args) const {
  auto ks = detail::multi_dispatch_key_set(args...);
  // Keys that are fallthrough should be skipped
  if (requiresBitsetPerBackend_) {
    auto backend_idx = ks.getBackendIndex();
    return impl::computeDispatchKeySet(ks, nonFallThroughKeysPerBackend_[backend_idx]);
  } else {
    return impl::computeDispatchKeySet(ks, nonFallThroughKeys_);
  }
}
Runtime
Runtime은 실제 디바이스에서 연산을 수행하기 위한 저수준 인프라를 제공합니다. 주요 구성 요소는 Device, Stream, Event, DeviceGuard, Allocator, Generator입니다.
Device
Tensor가 저장되어 있는 device를 표현합니다.
- Device는 device type과 index로 unique하게 구분
- Python 수준에서는 string으로 표현 (예:
cuda:0)
c10::Device는 value type으로 해석해야 합니다:
- 두
c10::Deviceobject가 같은 device type과 index를 가지면 → 같은 concrete device
Device index 해석:
- Negative: current device를 의미
- Non-negative: 특정한 concrete한 디바이스
- Device type이 CPU면 device index는 zero여야 함 (host에 해당)
(c10/core/Device.h)
sycl::device& get_raw_device(DeviceIndex device) {
  initDevicePoolCallOnce();
  check_device_index(device);
  return *gDevicePool.devices[device];
}
Unique한 c10::Device는 gDevicePool에 들어있는 sycl::device와 1:1 관계 (XPU 예시)
Stream
Heterogeneous computing에서의 실행 모델에서, host가 device로 command/data를 전달하면 device가 이를 처리합니다. Host는 device 완료를 기다리지 않고 asynchronous하게 동작합니다.
Stream은 host가 device로 전달한 command가 담긴 queue입니다:
- Host는 stream에 command를 삽입
- Device는 stream에서 FIFO 순서로 command를 처리
- 각 device마다 stream pool이 존재
(c10/core/Stream.h | XPU의 sycl::queue에 대응)
// Return whether all asynchronous work previously enqueued on this stream
// has completed running on the device.
bool Stream::query() const {
  impl::VirtualGuardImpl impl{device_.type()};  // ← DeviceGuard를 통해 device specific 구현체와 연결
  return impl.queryStream(*this);
}c10/core의 구현체는 device agnostic- Device specific 구현체와의 연결은 DeviceGuard를 통해 이루어짐
Stream API
query(): stream에 삽입된 모든 command가 처리되었는지 여부를 반환c10::Stream::query()→c10::impl::VirtualGuardImpl::queryStream→c10::impl::DeviceGuardImplInterface::queryStream(virtual)- XPU 구현:
c10::xpu::impl::XPUGuardImpl::queryStream→c10::xpu::XPUStream::query→sycl::queue에ext_oneapi_empty호출해 queue가 비어있는지 확인 - CUDA 구현:
c10::cuda::impl::CUDAGuardImpl::queryStream→c10::cuda::CUDAStream::query→ DeviceGuard를 선언하고cudaStreamQuery를 호출해 stream의 command가 모두 처리되었는지 확인
- XPU 구현:
synchronize(): host가 stream 안의 모든 command가 처리될 때까지 대기c10::Stream::synchronize→c10::impl::VirtualGuardImpl::synchronizeStream→c10::impl::DeviceGuardImplInterface::synchronizeStream(virtual)- XPU 구현:
c10::xpu::impl::XPUGuardImpl::synchronizeStream→c10::xpu::XPUStream::synchronize→sycl::queue에wait_and_throw를 호출해 queue에 삽입된 모든 command가 처리될 때까지 대기 - CUDA 구현:
c10::cuda::impl::CUDAGuardImpl::synchronizeStream→c10::cuda::CUDAStream::synchronize→ DeviceGuard를 선언하고c10::cuda::stream_synchronize를 호출 →cudaStreamSynchronize를 호출해 stream의 모든 command가 처리될 때까지 대기
- XPU 구현:
wait(event):c10::Stream::wait→event.block(stream)
Event
Event는 device progress를 확인하거나 stream 간의 dependence를 제어하기 위해 사용합니다.
event.record(stream)
- Stream에 record command를 삽입
- Record command가 처리되어야 이 event를 기다리는 stream이 재시작할 수 있음
was_marked_for_recording이 false → true로 변경
event.block(stream)
- Record command가 처리될 때까지 대기하라는 block command를 stream에 삽입
- Stream은 block command를 처리할 때 record command의 처리 여부를 확인
- Stream과 event의 device type은 같아야 하지만 device index는 다를 수 있음
- 같은 device index여도 deadlock이 발생하지 않음 (block command가 처리되기 전까지 계속 command를 처리해 record command를 처리할 수 있으므로)
(c10/core/Event.h | XPU: sycl::event 대응 | RBLN: 아직 event 미지원)
Event 구현 방식
Event는 InlineEvent<VirtualGuardImpl>을 멤버로 소유하며, 실제 동작은 이 멤버를 통해 위임됩니다:
// c10/core/Event.h
struct Event final {
    impl::InlineEvent<impl::VirtualGuardImpl> impl_;  // ← 구현을 멤버로 소유
};
// c10/core/impl/InlineEvent.h
template <typename T>
struct InlineEvent final {
void recordOnce(const Stream& stream);
void record(const Stream& stream);
void block(const Stream& stream);
bool query();
void synchronize();
void* event_ = nullptr;
T backend_; // VirtualGuardImpl - DeviceGuard에 의존
DeviceType device_type_;
DeviceIndex device_index_ = -1;
EventFlag flag_ = EventFlag::PYTORCH_DEFAULT;
bool was_marked_for_recording_ = false;
};Device specific한 부분은 T backend_(VirtualGuardImpl)를 통해 결국 DeviceGuard에 의존합니다:
Event API 상세
- 다양한 getter들:
device(),device_type(),device_index(),flag(),was_marked_for_recording(),eventId() record(stream): 주어진 stream에 record command를 삽입. record command가 처리되어야 이 event를 기다리는 stream이 재시작할 수 있음- stream과 event의 device type은 같아야 함 (event의 device index는 최초 record 시점에 stream의 index를 따라 설정됨)
c10::Event::record→c10::impl::InlineEvent<c10::impl::VirtualGuardImpl>::record→c10::impl::VirtualGuardImpl::record→c10::impl::DeviceGuardImplInterface::record(virtual)- XPU 구현:
c10::xpu::impl::XPUGuardImpl::record→ stream의sycl::queue에ext_oneapi_submit_barrier를 호출해 event에 record를 호출하기 이전의 command를 모두 처리한 후sycl::event를 선언함 - CUDA 구현:
c10::cuda::impl::CUDAGuardImpl::record→ 주어진 stream의 device로setDevice하고cudaEventRecord를 호출하고 원래 device로setDevice함
- XPU 구현:
c10::impl::DeviceGuardImplInterface::record를 수행한 후was_marked_for_recording_을true로 변경
recordOnce(stream): Event는 thread-safe하지 않아서 record가 한 번만 호출되도록 보장c10::Event::recordOnce→c10::impl::InlineEvent<c10::impl::VirtualGuardImpl>::recordOnce→c10::impl::InlineEvent<c10::impl::VirtualGuardImpl>::recordwas_marked_for_recording_이false일 때만 record 실행
block(stream): event에 record를 호출했을 때 삽입된 record command가 처리될 때까지 대기하라는 block command를 stream에 삽입. stream은 block command를 처리할 때 record command의 처리 여부를 확인함- stream과 event의 device type은 같아야 하지만 device index는 다를 수 있음
- 같은 device index여도 block command가 stream에서 처리되기 전까지 계속 command를 처리해 record command를 처리할 수 있으므로 deadlock이 발생하지 않음
c10::Event::block→c10::impl::InlineEvent<c10::impl::VirtualGuardImpl>::block→c10::impl::VirtualGuardImpl::block→c10::impl::DeviceGuardImplInterface::block(virtual)- XPU 구현:
c10::xpu::impl::XPUGuardImpl::block→ stream의sycl::queue에sycl::eventlist를 argument로ext_oneapi_submit_barrier를 호출.ext_oneapi_submit_barrier는cudaStreamWaitEvent과 같은 역할 - CUDA 구현:
c10::cuda::impl::CUDAGuardImpl::block→cudaStreamWaitEvent를 호출. 주어진 stream은 event의 record command가 처리될 때까지 대기함
- XPU 구현:
query(): event에 record를 호출했을 때 삽입된 record command가 처리되었는지 여부를 반환. record를 호출한 적이 없으면 항상true를 반환c10::Event::query→c10::impl::InlineEvent<c10::impl::VirtualGuardImpl>::query→c10::impl::VirtualGuardImpl::queryEvent→c10::impl::DeviceGuardImplInterface::queryEvent(virtual)- XPU 구현:
c10::xpu::impl::XPUGuardImpl::queryEvent→sycl::event의command_execution_status가event_command_status::complete인지 여부를 반환 - CUDA 구현:
c10::cuda::impl::CUDAGuardImpl::queryEvent→ event에 대응되는 CUDA event에cudaEventQuery를 호출해 event의 record command가 처리되었는지 여부를 반환
- XPU 구현:
synchronize(): host가 event에 record를 호출했을 때 삽입된 record command가 처리될 때까지 대기c10::Event::synchronize→c10::impl::InlineEvent<c10::impl::VirtualGuardImpl>::synchronize→c10::impl::VirtualGuardImpl::synchronizeEvent→c10::impl::DeviceGuardImplInterface::synchronizeEvent(virtual)- XPU 구현:
c10::xpu::impl::XPUGuardImpl::synchronizeEvent→sycl::event에wait_and_throw를 호출 - CUDA 구현:
c10::cuda::impl::CUDAGuardImpl::synchronizeEvent→ CUDA event에cudaEventSynchronize를 호출해 event의 record command가 처리될 때까지 대기
- XPU 구현:
DeviceGuard
DeviceGuard는 특정한 device, stream, event의 안전한 사용을 보장하는 장치입니다:
- 정해진 scope에서 특정 device를 set하고, scope을 벗어나면 원래 device로 reset
- RAII (Resource Acquisition Is Initialization) 디자인 패턴
- Nesting된 형태로 사용 가능


DeviceGuard 사용 예제: CUDA stream의 query() 구현
bool query() const {
  DeviceGuard guard{stream_.device()};
  cudaError_t err = C10_CUDA_ERROR_HANDLED(cudaStreamQuery(stream()));

  if (err == cudaSuccess) {
    return true;
  } else if (err != cudaErrorNotReady) {
    C10_CUDA_CHECK(err);
  } else {
    // ignore and clear the error if not ready
    (void)cudaGetLastError();
  }

  return false;
}
사용 예제: current device가 stream_.device()로 세팅되고, guard가 소멸되며 원복
구현 방식: DeviceGuard → InlineDeviceGuard → XPUGuardImpl (device-specific)
1단계: DeviceGuard. RAII wrapper로 guard_.reset_device()를 호출:
void reset_device(at::Device device) {
  guard_.reset_device(device);
}
2단계: InlineDeviceGuard. VirtualGuardImpl을 통해 device-specific 구현체로 위임:
template <typename U = T>
typename std::enable_if_t<std::is_same_v<U, VirtualGuardImpl>> reset_device(
    at::Device device,
    const impl::DeviceGuardImplInterface* impl = nullptr) {
  auto index = device.index();
  if (index == -1)
    return;
  if (device.type() == original_device_.type()) {
    AT_ASSERT(impl == nullptr || impl->type() == device.type());
    impl_.setDevice(device);
3단계: XPUGuardImpl (device-specific). 실제 device 전환 수행:
void setDevice(Device d) const override {
  TORCH_INTERNAL_ASSERT(d.is_xpu());
  c10::xpu::set_device(d.index());
}
VirtualGuardImpl API
| 분류 | API |
|---|---|
| Device 관련 | exchangeDevice, getDevice, setDevice, uncheckedSetDevice, deviceCount |
| Stream 관련 | getStream, getNewStream, getDefaultStream, getStreamFromGlobalPool, exchangeStream |
| Event 관련 | record, block, queryEvent, destroyEvent |
| Stream 동기화 | queryStream, synchronizeStream |
| 기타 | recordDataPtrOnStream |
Allocator
Device memory를 관리하는 structure입니다. 대부분의 중요한 함수들이 virtual로 정의되어 있습니다:
-
virtual DataPtr allocate(size_t n) -
DataPtr clone(const void* data, std::size_t n)- non-virtual,allocate와copy_data를 조합해 구현 -
virtual bool is_simple_data_ptr(const DataPtr& data_ptr) -
virtual DeleterFnPtr raw_deleter() -
virtual void copy_data(void* dest, const void* src, std::size_t count) -
Device specific allocator는 이 structure를 상속받아 구현
-
DataPtr: device에 잡힌 메모리를 표현하기 위한 class (device와 그 device 내 주소에 해당하는 pointer를 보유)
(c10/core/Allocator.h)
Random Number Generator
- Pseudo Random Number Generator (PRNG) engine을 사용하는 interface
- 사용자는 seed를 제공하거나 상태를 확인할 수 있음
Common methods for all generators:
-
virtual void set_current_seed(uint64_t seed) = 0 -
virtual void set_offset(uint64_t offset) = 0 -
virtual uint64_t get_offset() const = 0 -
virtual uint64_t current_seed() const = 0 -
virtual uint64_t seed() = 0 -
virtual void set_state(const c10::TensorImpl& new_state) = 0 -
virtual c10::intrusive_ptr<c10::TensorImpl> get_state() const = 0 -
const c10::intrusive_ptr<c10::GeneratorImpl>& getIntrusivePtr() const -
c10::intrusive_ptr<c10::GeneratorImpl> clone(const c10::intrusive_ptr<c10::GeneratorImpl>& generator_state) const -
ATen Generator는 device agnostic한 class
-
Device specific한 구현을 위해
c10::GeneratorImpl을 제공
(aten/src/ATen/core/Generator.h)
PyTorch Build
How to Build from Source
# Get git repository
git clone https://github.com/pytorch/pytorch
cd pytorch

# Update git submodule (기존 checkout을 업데이트하는 경우에도 필요)
git submodule sync
git submodule update --init --recursive

# Install dependencies
pip install --group dev
# Linux의 경우 추가로:
pip install mkl-static mkl-include
make triton

# Set environments (optional)
export MAX_JOBS=16
export USE_CUDA=1   # CUDA 비활성화: export USE_CUDA=0
                    # ROCm 비활성화: export USE_ROCM=0
                    # Intel GPU 비활성화: export USE_XPU=0

# Build & Install (editable mode)
python -m pip install --no-build-isolation -v -e .- Python 3.10 이상, C++20 지원 컴파일러 필요 (Linux: gcc 11.3.0+)
- 디스크 공간 10GB 이상, 초기 빌드 시 30~60분 소요
- Python code는 source 형태로 남아있음
- https://github.com/pytorch/pytorch?tab=readme-ov-file#install-pytorch
Build Configuration
참고: pytorch/setup.py
일반 설정 환경변수
| 변수 | 설명 |
|---|---|
DEBUG | 디버그 심볼과 함께 최적화 없이 빌드 (-O0 -g) |
REL_WITH_DEB_INFO | 최적화와 디버그 심볼과 함께 빌드 |
USE_CUSTOM_DEBINFO | 지정된 파일들에 대해서만 디버그 정보 포함 ("file1.cpp;file2.cpp") |
BUILD_TEST | 테스트 빌드 활성화 |
MAX_JOBS | 코드 컴파일에 사용할 최대 작업 수 |
CFLAGS | C와 C++ 파일 컴파일에 적용할 플래그 |
CC | 사용할 C/C++ 컴파일러 |
CMAKE_FRESH | cmake 캐시를 무시하고 새로 구성 |
VERBOSE | 빌드 출력의 상세 수준 제어 |
기능 토글 환경변수
| 변수 | 설명 |
|---|---|
DEBUG_CUDA | CUDA 커널을 디버그 정보와 함께 빌드 (-lineinfo --source-in-ptx, CUDA 12에서 OOM 발생 가능) |
USE_CUDA | CUDA 빌드 활성화/비활성화 |
USE_CUDNN | cuDNN 빌드 활성화/비활성화 |
USE_CUSPARSELT | cuSPARSELt 빌드 활성화/비활성화 |
USE_CUDSS | cuDSS 빌드 활성화/비활성화 |
USE_CUFILE | cuFile 빌드 활성화/비활성화 |
USE_FBGEMM | FBGEMM 빌드 활성화/비활성화 |
USE_KINETO | libkineto (프로파일링) 활성화/비활성화 |
USE_NUMPY | NumPy 빌드 활성화/비활성화 |
USE_MKLDNN | MKLDNN 사용 활성화/비활성화 |
USE_NNPACK | NNPACK 빌드 활성화/비활성화 |
USE_DISTRIBUTED | 분산 학습 (c10d, gloo, mpi) 빌드 활성화/비활성화 |
USE_OPENMP | OpenMP 병렬화 활성화/비활성화 |
USE_FLASH_ATTENTION | Flash Attention 빌드 활성화/비활성화 |
USE_MEM_EFF_ATTENTION | Memory Efficient Attention 빌드 활성화/비활성화 |
버전 및 아키텍처 관련
| 변수 | 설명 |
|---|---|
PYTORCH_BUILD_VERSION | PyTorch 버전 지정 |
PYTORCH_BUILD_NUMBER | PyTorch 빌드 번호 지정 |
TORCH_CUDA_ARCH_LIST | 빌드할 CUDA 아키텍처 지정 (예: "6.0;7.0") |
TORCH_XPU_ARCH_LIST | 빌드할 XPU 아키텍처 지정 |
PYTORCH_ROCM_ARCH | 빌드할 AMD GPU 타겟 지정 |
외부 라이브러리 관련
| 변수 | 설명 |
|---|---|
CUDA_HOME (Linux/macOS) / CUDA_PATH (Windows) | CUDA 설치 위치 지정 |
CUDNN_LIB_DIR, CUDNN_INCLUDE_DIR, CUDNN_LIBRARY | cuDNN 설치 위치 지정 |
NCCL_ROOT, NCCL_LIB_DIR, NCCL_INCLUDE_DIR | NCCL 설치 위치 지정 |
BLAS | 사용할 BLAS 라이브러리 지정 (MKL, Eigen, ATLAS, FlexiBLAS, OpenBLAS) |
USE_SYSTEM_LIBS | 시스템 제공 라이브러리 사용 여부 |
Build의 최종결과물
Python package를 설치하면 shared object와 Python module들이 함께 설치됩니다.
Shared objects
libtorch_python.so libtorch.so libtorch_xxx.so libc10_xxx.so libc10.soPython modules
_awaits _custom_op _decomp _dispatch _dynamo _export
_functorch _higher_order_ops _inductor _lazy _library
_logging _numpy _prims _prims_common _refs _strobelight
_subclasses _vendor amp ao autograd backends compiler contrib
cpu cuda distributed distributions export fft func futures
fx jit linalg masked monitor mps mtia multiprocessing nested nn
onnx optim package profiler quantization signal sparse
special testing torch utils xpu
Eager Mode의 Shared Object들
libtorch.so는 여러 so를 한꺼번에 묶는 wrapper 역할. 실구현체는 들어있지 않음- CUDA / XPU backend 포함
Eager Mode의 소스 코드 구조
주요 라이브러리
- ATen (A Tensor C++ Library)
- Tensor 연산 및 수학적 작업을 정의한 library
- 사용자에게 노출되는 고수준 API
- Python integration point
- namespace:
at
- C10 (Caffe2 and ATen)
- metadata/memory 관리 및 op dispatch 담당
- 내부적으로 사용되는 저수준 API
- Backend integration point
- namespace:
c10
- Generated files
- 주로 Op별 C++ frontend, AutoGrad kernels, dispatch registration 코드
native_functions.yaml와derivatives.yaml로부터 생성
참고: https://discuss.pytorch.org/t/whats-the-difference-between-aten-and-c10/114034/3
직접 작성된 코드 vs. 생성된 코드
Directory Structure: aten (중요한 것들 위주)
aten/src/ATen/
benchmarks/: ATen benchmark codecore/: Tensor 관련 핵심 선언과 구현boxing/,dispatch/,op_registration/: operator dispatch 관련 구현
cuda/,hip/,metal/,mps/,vulkan/,xpu/: device dependent 구현 (runtime 등)- CUDAEvent, XPUDevice 등
- 이중 일부 directory에는 device 전용 계산 library 구현도 포함
cpu,cuda,cudnn,miopen,mkl
native/: operator 구현체들,native_functions.yaml이 여기 포함됨- Device independent한 operator 구현체는 바로 밑에 포함
- Device dependent한 operator 구현체는 sub directory 안에 포함
cpu,cuda,cudnn,hip
templates/:native_functions.yaml을 통해 gen source code들의 뼈대가 포함test/: ATen test code
Directory Structure: c10
c10/
benchmark/: C10 benchmark codecore/: PyTorch 핵심 구현과 선언, aten이 상속받아 구현- Device 관련:
Allocator,Device,DeviceGuard,Event,Stream등 - Dispatch 관련:
DispatchKey,DispatchKeyset등 - Tensor 관련:
TensorImpl,StorageImpl등
- Device 관련:
cuda/,xpu/,hip/,mobile/: 특정 device의 전용 구현CUDACachingAllocator,XPUStream등
macros/: compiler에서 해석할 inline attributes 관련 macro- Shared library visibility 조절, warning 강제 무시 등
test/: C10 test codeutil/: helper class/method들- Environments, exception, backtrace 등
- Array, BFloat16, Complex 등
Directory Structure: Generated Files
build/aten/src/ATen/ : gen.py (input: native_functions.yaml)
ops/{operator}.hcore/TensorBody.hOperators.cppRegister{backend}.cpp
torch/include/torch/csrc/autograd/generated/ : gen_variable_type.py (input: derivatives.yaml)
Functions.hpython_functions.hpython_return_types.hvariable_factories.hVariableType.hViewFuncs.h
torch/csrc/autograd/generated/
VariableType.cpp(gen_variable_type.py)Functions.cpp(gen_autograd_functions.py)python_functions.cpp(gen_autograd_functions.py)python_torch_functions.cpp-gen_python_functions.py(input:native_functions.yaml)